Monday, January 8, 2007

It stands, but can it run?

Wow, I've done a LOT since my last update! I received the Dragon's Lair repro marquee brackets a couple days ago, so I was finally able to make some (relatively) accurate cuts for the marquee housing. With that piece of the puzzle in hand, things came together quickly. I mapped out the rest of the layout on the interior side panels and cut the blocking for the additional panels. Learning from my mistakes with the first cabinet, I pre-drilled holes through the blocking to ensure the wood wouldn't split during assembly. With all the pieces cut, it went together like something from Ikea. I was somewhat surprised to notice that everything lined up relatively well. I still have a ways to go before I'm playing Dragon's Lair in the comfort of my own home, but I'm more than happy to see the cabinet standing on its own.

I also finally received my digital camera in the mail. That being said, here's some pictures of the assembly process. Click image thumbnails for bigger pics. [Eternal love and thanks to Becca for snapping these pics and taking time away from Twilight Princess to assist with cutting and assembly.]
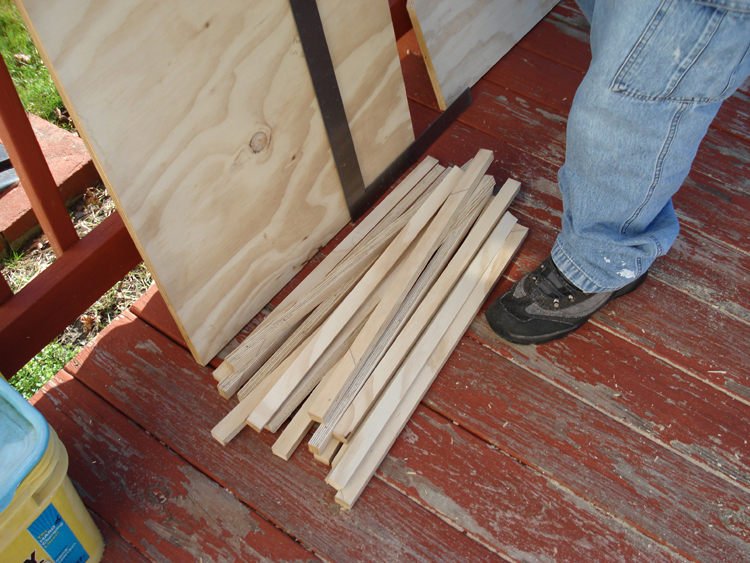


I totally screwed up my first attempt at the cabinet top, so I decided to make use of my error and make some support blocking from the 3/4" plywood cut 1" wide.
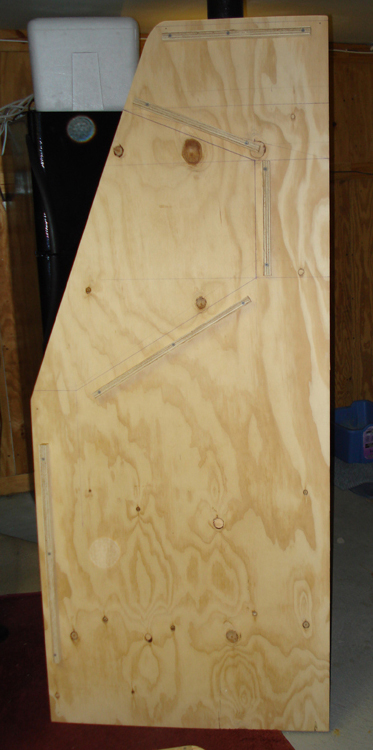


After tons of trial and error, I finally got all my measurements to make sense. I had to keep in mind the thickness of the panels being attached and accomodate when screwing in the supports. They're snugly secured, but I wonder if I should have taken the overkill approach and used liquid nails as well.
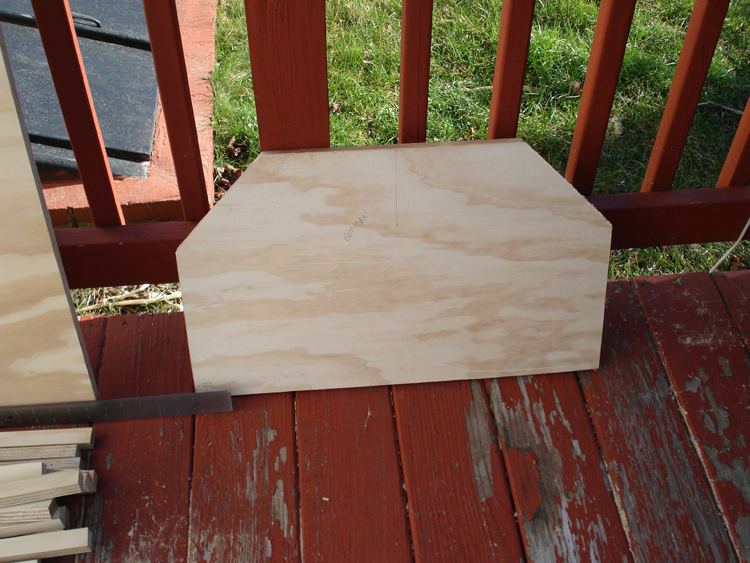


The bottom marquee panel cut way too short. I measured the length from top to bottom instead of from the first angle point. Oops!
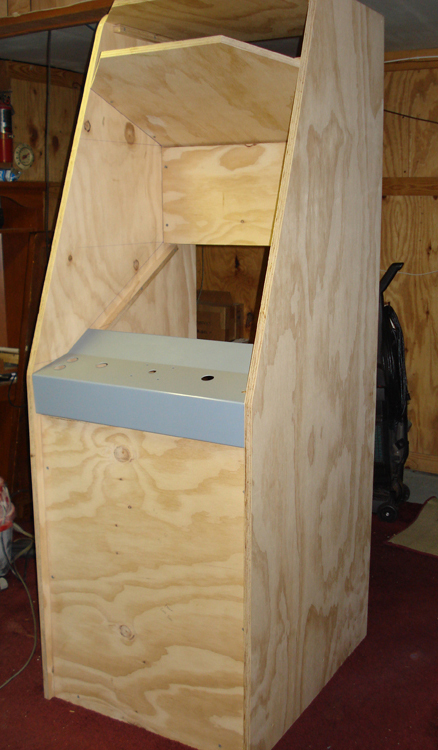


It lives! Well, kind of ... At least its standing without leaning. The control panel is just temporarily screwed in place to get an idea of the final look.
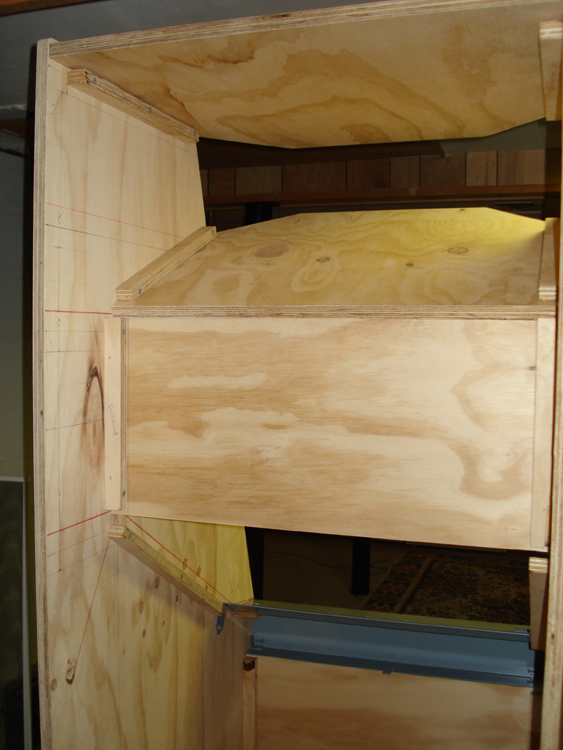


A shot of the back where the speakers and scoreboard go. I need to cut holes for those things eventually.
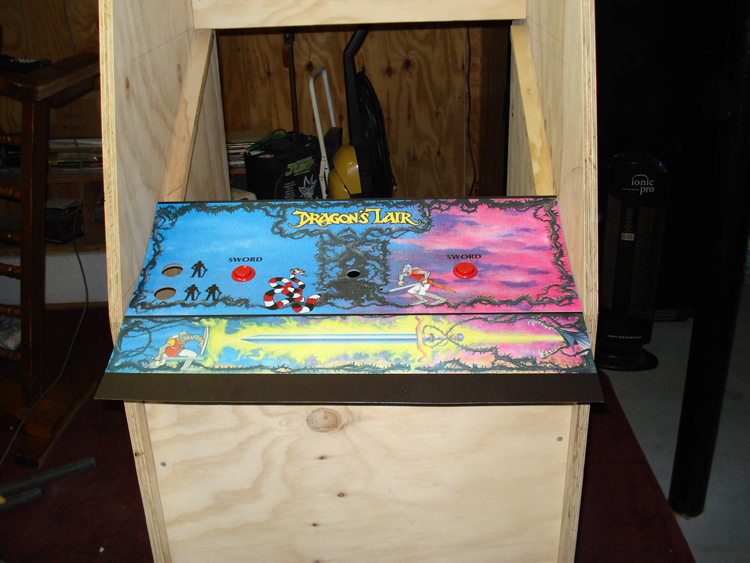


I couldn't help but place the control panel overlay over the control panel to again get a look at how things will ultimately come together. I didn't want to ding up the pristine art, so I didn't risk bending the art into place.
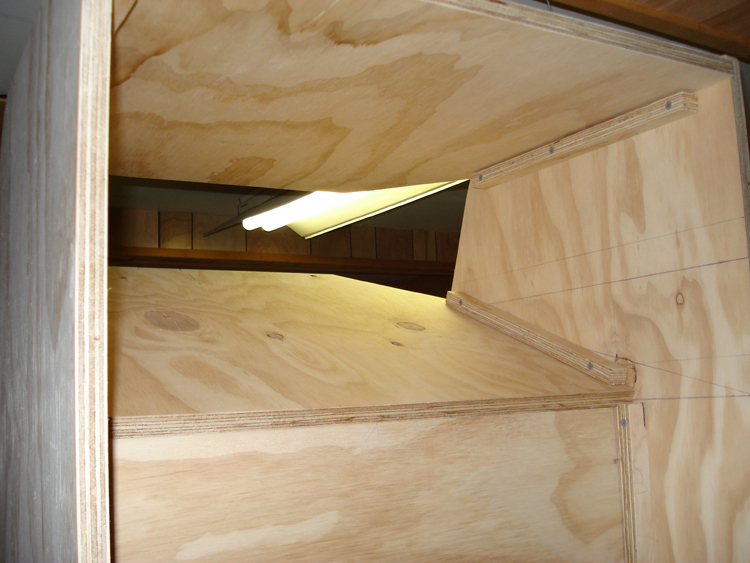


Another shot of the cabinet rear. I sure hope the marquee plexi lines up with my measurements. Yes, it was a risk to make these cuts without it.
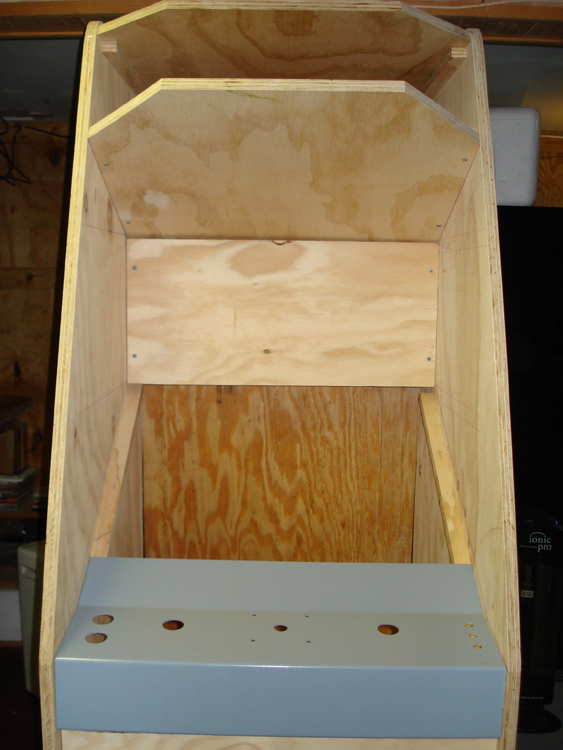


I placed the cabinet back on temporarily to ensure it would fit. Yes it fit, but the wood is badly bowed. I currently have it lying flat on the floor with the cabinet on top of it. Hopefully the weight of the cabinet will flatten it out somewhat.

And finally, here's a shot of the revamped Marvel Superheroes control panel.
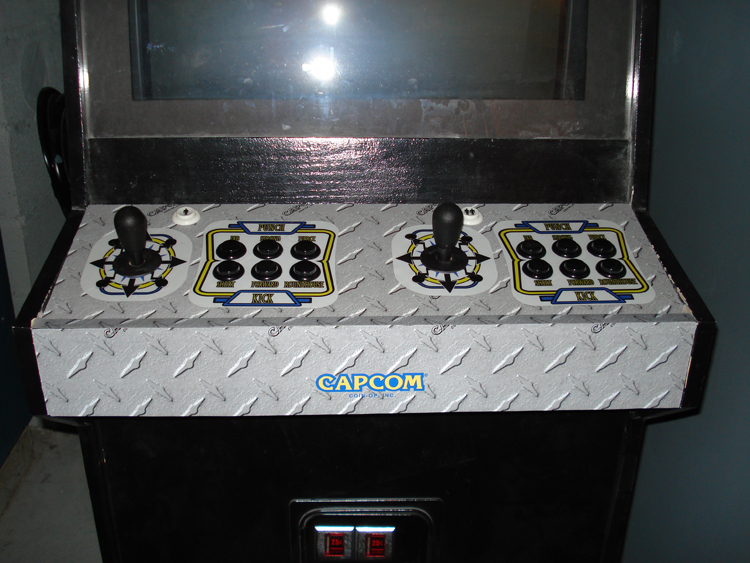


I like how it came out. I still need to touch up some paint where I scuffed and scratched up the cabinet from being way too rough with the control panel.


This week I'll finish up filling the unnecessary holes in the control panel and apply the overlay. I'm still debating if I should disassemble the entire cabinet to paint and then reassemble. My patience (or lack thereof) will be the deciding factor. I'll visit Lowes on Tuesday to pick up a few little things I need, like castors and a marquee light. Barring any major unforseen issue, I'd like to think the cabinet will be fully assembled by next weekend.

More pictures coming soon as I progress!

Wednesday, January 3, 2007

Hurry up and wait

I ordered an original LED scoreboard from a guy through the Laser Disc Games Classifieds over at the Dragon's Lair Project. As much as I want this cabinet to look arcade accurate, it’s unfortunate that the scoreboard is original. The scoreboard connects to the PC parallel port, but requires a custom cable. I've never made anything of the sort, so I'm still holding out for the chance someone might have one available for sale. Little things aside, it seems I kind of lucked out in the end because the guy also had an original marquee plexi for sale. Unfortunately the plexi has a Space Ace marquee attached, so some cleaning will be necessary. The guy recommended I apply some heat (like from a hairdryer) and use rubbing alcohol to remove any residual adhesive. I'm considering having some repro marquee plexis made once I receive this one. I guess it all depends on how difficult and/or expensive it'll be at my local plexi supplier.

I received the reproduction control panel today via USPS. It's a heck of a lot heavier than I imagined it would be, but definitely very well constructed. It was originally constructed as a Space Ace conversion control panel, so there are three unnecessary holes that need filling and sanding. I plan on stopping in at my local auto parts store in the morning to pick up some epoxy and Bondo to remedy this minor issue. I can't wait to attach the control panel overlay. I'm off tomorrow night, so I should be able to have it done by sometime Friday.

Since I've ordered just about everything I need to assemble the cabinet, I decided to go ahead and buy a coin door from a seller on eBay. Ironically this is the only eBay purchase I made for this project. I'm still awaiting the marquee rails (and now the marquee plexi) to verify my measurements before I start screwing everything together. As frustrating as it is for me to wait even longer to see my dream realized, I still feel it’s in my best interest to ensure an accurate assembly. The only other critical component I need is a pair of speaker grills. I was offered a set for $50, but that seems insanely steep. I've been looking for a similar type of metal to make my own, but haven't had any luck yet.

I'm still waiting for the digital camera to arrive so I can post some pictures. It’s almost a good thing that I'm also waiting on some critical components, as it allows me to take pictures while still in the early stage of construction. It looks like it could potentially be a couple more weeks before the cabinet is standing, but I can't really complain. As I've said before, I still have the Marvel Superheroes cabinet to finish up during my down time.

Tuesday, January 2, 2007

When in doubt, get lazy

Last night I used the jigsaw to cut the front arc for the (still screwed together) side panels and sanded all of the edges. I brought the sides back inside the house, unscrewed the panels, and mapped the support placement to the interior of both sides. I measured and remeasured the reproduction marquee overlay and control panel overlay to ensure everything was lining up properly, but my nerves got the better of me. I finally decided to wait for the reproduction control panel and marquee brackets before moving any further. I know in my heart its the right decision, as I'd be working backwards if those pieces didn't measure up in the end. Technically I could go outside and cut all the support braces, considering they don't have to be accurately measured. I guess I'll wait and see how motivated I feel after my second cup of coffee.

My Laser Disc Games Classifieds account over at the Dragon's Lair Project was finally approved by a moderator, so I was able to list a couple of my wanted items. Just as my post was published, I received an email from a chap willing to part with a working LED scoreboard for a reasonable price. I'm currently awaiting some pictures of the scoreboard before I make a final decision. I still haven't had any luck finding a repro (or original) marquee plexi or reasonably priced speaker grills. The marquee plexi is uber important to me right now, so I hope someone comes through real soon. I don't have an issue with making my own repro speaker grills for the time being.

Since I have to work both tonight and tomorrow night (and more rain expected for this weekend), I really don't know when I'll be able to progress any further with the Dragon's Lair cabinet. The good news, if I choose to look at it that way, is that I can finish up the existing arcade cabinet. All that's left to do with that one is print the marquee and instruction card art, swap out the monitor, and rewire the control panel. I still feel confident that everything will come together quickly once I have a couple more items in hand.

Pics and diagrams are coming soon - I promise! Becca snapped some pictures with our trusty 35mm camera and we just ordered a nice Sony digital camera. I've also been working on some really simplified plans in Photoshop.

Sunday, December 31, 2006

Playing the (re)name game

I've been sleeping like crap all week, so I decided to be somewhat lazy today. [Translation: No progress was made today on the Dragon's Lair cabinet.] I did, however, make some progress with the existing arcade cabinet. While surfing around the net, I found the marquee and instruction card art for Marvel Super Heroes. The really cool (geeky) thing about the instruction cards is that they're in Japanese. Since Becca and I have had an anime theme throughout the house for some time now, it seems almost appropriate. I also found an instruction card for X-men vs. Street Fighter. While not necessarily part of the Marvel Super Heroes motif, it sports a diamond plate background that matches the control panel. It also doesn't say X-men vs. Street Fighter on the card, so it looks like a nice generic addition.

Since I wasn't able find a Marvel vs Capcom marquee, this seems to be an acceptable compromise. I'll get all three instruction cards printed, along with the marquee art, and decide on the final layout once everything is in hand. Since the existing arcade cabinet project is nearly complete, I went ahead and ordered one Capcom side decal. Providing I don't have a lazy relapse, the Marvel Super Heroes cabinet should be totally complete by the end of this week.

Pictures and diagrams coming soon ...

Saturday, December 30, 2006

It begins! No, really!
(warning: long-ass post ahead!)

A lot has happened in the last couple days! Here's a rundown of each project:

Existing cab: I measured the existing control panel and cut a 1/2" piece of laminated particle board for the replacement panel. Once cut, I arranged the Capcom overlay decals in place and affixed them temporarily with painters tape. Once I had them placed in the appropriate positions, I traced the circle cutouts for joystick and button placement. I removed the decals from the panel and then used a 1-1/8" paddle bit to drill out the holes.

Since the Capcom overlay (underlayment) was much larger than my control panel, I decided to cut a piece of the diamond plate pattern for the top. I left about a half inch overage on each side to make my destined-to-be-sloppy placement a little more forgiving. As with the decals, I held the overlay in place with painters tape. I picked up half of the overlay and removed the backing from the adhesive. I cut off the backing with scissors and slowly smoothed down the overlay to the control panel. Once I worked all the bubbles out from underneath, I repeated the process with the other half. Using a small x-acto blade, I trimmed out all of the hole openings.

Placing the decals on top of the overlay, I screwed all the buttons in the holes to hold the decals in place. As with the overlay adhesion, I removed the top row of buttons, removed and trimmed the exposed backing, and slowly pressed the decal into place. The bottom row of buttons was then removed and the process was repeated. I also used a single button in place of the joystick to place their respective decals.

With the control panel near completion, I turned my attention to the cabinet itself. I trimmed a section of the control panel overlay with the large Capcom logo to the size of the cabinet's front (just below the control panel) and pressed it into place. I then cut a second strip for the bottom of the control panel housing, creating the illusion of one large wrapped control panel. Once I get some pictures up, you'll see what I mean. I still need to rewire everything, but that's a task for another day.

I also still need to swap out the 27" TV in the cab for a 20" flat screen PC monitor sitting in the middle of the living room floor. New PC parts are on the way to speed up MAME a bit (for games like MK3). Once that's done, I'll mask the bezel to accommodate the new size and affix the Marvel vs Capcom instruction cards. Still looking for a Marvel vs Capcom marquee ... sigh ...

Dragon's Lair cabinet: I got wood! WOOHOO! Finally! As I stated in my last post, my bro-in-law got his hands on a truck to fulfill my lumber lacking needs. We picked up three 4'x8' sheets of 3/4" finish grade plywood and one 4'x8' sheet of what I call 'shit grade' plywood. We brought the haul back to my house, only to have it spend the night on my deck. You'd think with all my whining over not having wood, I'd had actually done some fabrication. It's all good, as I think I more than made up for that today.

I awoke at the crack of dawn (ok, more like 8am) and guilted Becca into giving me a hand making some rough cuts. We began by cutting some scrap 2x4s we had to build a sturdy base for the cabinet. This foundation is the width and depth of the overall cabinet dimensions, allowing for the recessed front and rear panels. A piece of 3/4" plywood was then screwed to the top of the frame. This will later serve as the platform for the PC and speaker amplifier.

We then cut 2' off the bottom of two sheets of finished plywood, creating two 2' x 4' and 4' x 6' pieces. We then cut 30" off each 4' x 6' piece, giving us two 6' x 2 1/2' pieces. The 1 1/2' pieces remaining from this cut are basically scrap, so we set them aside. Next we removed 1/2" from the 2' x 4' pieces, resulting in two 23 1/2" x 4' pieces. These pieces will be used to make the marquee top and bottom. I apologize if this all sounds confusing. Rest assured, diagrams are coming! The rear access panel was cut from the 'shit' plywood (since no one will ever see it) and set aside. Ironic to cut this piece on day one, considering it'll be the last piece used in the cabinet's assembly.

One thing I learned quickly when constructing the first arcade cabinet was cutting once beats cutting twice. Basically, the sides of an arcade cabinet mirror each other (left and right), so you need to be extra careful to totally ensure everything will line up level in the end. The best away around this potential hazard is to screw the two side panels together and make both cuts simultaneously! We took the two 6' x 2 1/2' pieces (smoothest side facing in) and screwed them together. Once secure, I measured the two points for the angled slope and connected the dots. I used a circular saw to make the cut and was quite impressed with the results. Now I can be secure in the fact that the side panels are identical and everything should fit together snugly.

Unfortunately it started to rain, so everything was quickly hurried inside the basement. Since cutting was no longer an option, I decided to map out tomorrow's plan of attack. I began by tracing out a guideline for the arc in the uppermost portion of the side panels. I tried using a poor man's compass (a tack in the center of the arc with a string tied to a pencil), but wasn't satisfied with the result. In the end, I ended up stenciling the cover of a Folger’s coffee can to achieve an acceptable arc. Tomorrow I will cut the arc (roughly) with a jigsaw and sand until smooth. As a precaution, I'll also sand smooth all exposed sides of the panels to ensure perfect final alignment.

While I still have the panels screwed together and lying on my cellar floor, I went as far as mapping out the baton placement for final assembly. I won't go into a lengthy explanation now, as I know none of it will make a bit of sense. When I post the diagrams (and hopefully some pictures), it'll all come together. Once I plotted everything out, I became quite concerned about the size of the monitor destined for this cabinet. I measured the monitor a couple times and compared it to the cabinet markings. I'm still unsure if it'll fit in there. If it actually does fit, I'm afraid there won't be an inch to spare for the cables.

I'm more than satisfied with what I accomplished today, considering my sore shoulder and inclement weather. Once the marquee brackets and control panel arrive, things will really kick into high gear! I hate to jinx myself, but I'm almost convinced this thing could be up and running (functionally, not 100% complete) by next weekend.

Friday, December 29, 2006

Catch-up doesn't cut the mustard

The events of the last few days are a bit fuzzy, but here's what I know to be true: I received the 20 feet of leather textured t-molding from t-molding.com. It came in one big coiled piece, so I'm already nervous about trimming it nice and neat. I also ordered and received the official NOS Capcom control panel overlay and overlay decals from QuarterArcade for my existing cab. Nice stuff! Like the Dragon's Lair control panel overlay, the Capcom overlay is heavy gauge stuff and should be durable enough to accept the abuse of everyday use. In theory, I should have the new control panel assembled within the next couple days. Its just a matter of motivation.

I arranged transportation for the wood necessary to being the Dragon's Lair fabrication, but then karma dealt a crushing blow: I tore my shoulder muscle (trying to get comfortable sleeping) and ended up in the ER until 3am Thursday morning. Fortunately I was able to make alternate arrangements and should be able to pick up the wood today. I'm still a but sore and my mobility is somewhat limited, but I think I can muster the strength to make some basic cuts before calling it a day. We shall see.

Repro marquee brackets and control panel are on the way. I really need the brackets to ensure my measurements are correct. I don't want to cut the wood for the marquee until I have them in hand. I should have cut the wood for the base with the scrap I've had all along, but that would have been too smart for me. Ah well...

Now I really need a digital camera to snap pictures of the assembly process. There's a chance I'll move forward without taking pictures, as much as that defeats the purpose of this blog. Maybe I'll just snap some pix with the trusty 35mm camera and post them later.

I just got a call from my bro-in-law saying he's on his way with a truck to pick up the wood. W00t! More updates in a bit...

Saturday, December 23, 2006

Like sands through the hourglass ...

...so are the dollars from my bank account. Plunked down some cash for some items on my need list tonight. I ordered the official NOS Capcom control panel overlay and overlay decals from QuarterArcade for my existing cab ($62). Luckily this conversion shouldn't take much time, effort, or cash to complete. All that's left now is to find the marquee art (NOS or repro), order the side decals (NOS), print bezel cards (repro), and fabricate a new control panel. Once everything is in hand, it should only take a couple hours to put together. Unfortunately, the same can't be said for the Dragon's Lair cabinet. I did, however, order the repro maquee brackets tonight as well. They're being shipped raw (need to be painted), because I really need to curb my spending at this point. Nothing a $9 can of spraypaint can't fix.

Of course I still need wood. I'm pretty sold on the idea of using 3/4" plywood for this project, as opposed to 3/4" MDF like my first cab. While MDF is super structurally sound, smooth as a baby's ass, almost impervious to warping, and easy to cut, it's just too damn heavy to work with. When I constructed the first cab, I screwed both side panels together before cutting to ensure uniformity. My bro-in-law and I struggled to move the piece outside to cut and back into the basement for assembly. I think plywood is a relatively safe substitution and should be a lot easier to manipulate.

I'm really trying to hold out for a friend with a truck to transport the materials I so desperately need. I've tried other methods in the past, such as home delivery and truck rentals. Home delivery is a screw job because you don't get to select your materials in advance. I think they purposely throw on the truck the most warped wood in stock, knowing you're going to sign off on and unload your material before noticing exactly how ripped off you just got. After this experience, I'd much rather prefer hand selecting my materials and transporting them myself. For big jobs, I have no issue with renting a truck form the supplier. (I've done this a couple times with Lowes.) Unfortunately I can't justify renting a truck this time around for only a few sheets of plywood. As anxious as I am on starting the Dragon's Lair cab, I really do believe I'm better off not pissing away money that might come in handy later in the process.

Just waiting for a few more items to arrive before I snap some pics to post. As usual, I picked the perfect time to start another massive undertaking - winter ... and right at the holidays, to boot! Yay me!